Mathpix Snipping Tool
The Mathpix Snipping Tool is the desktop app for macOS, Windows, and Linux. With a single keyboard shortcut, you can crop an equation or piece of text on your screen and have the text/LaTeX copied to your clipboard.
macOS
Note: the earliest version of MacOS that our app supports is MacOS Sierra 10.12. If you are running an earlier version of MacOS and would like to use Snip, please try our web app or our mobile apps on iOS and Android.
Installing the app
The MacOS app can be downloaded from the desktop downloads page of our website or by clicking here.
Once the download is complete, double-click the file in your Downloads folder to open it. Next, you will see a prompt to drag Snip into your Applications folder. Be sure to drag Snip into your Applications folder so it is easier to find in the future!
You will notice that the Mathpix logo has appeared in your system tray (in the top right corner of your screen):

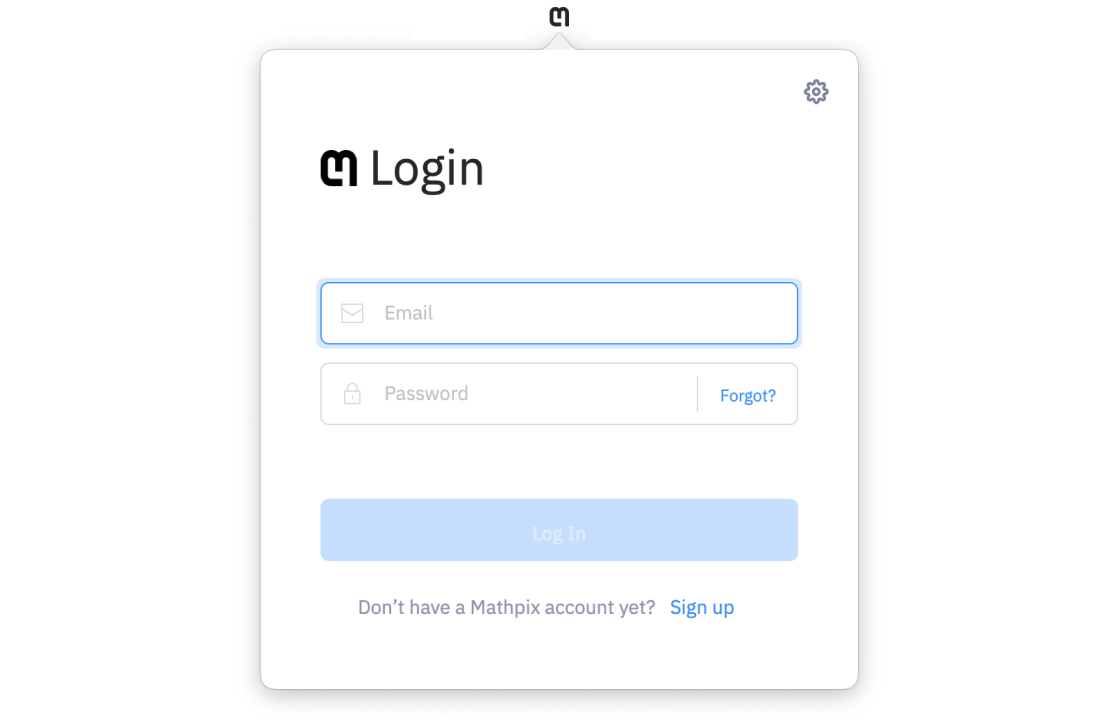
To get started using the app, click the Mathpix icon to open the app window. When the app opens, you will be prompted either to Sign up for or Log in with your Mathpix account. Don’t have an account yet? Click here to Sign up for an account.
Quickstart guide
This is a brief guide for getting up and running Snip on your Mac computer.
1. Download and install Snip
If you haven’t already, download the Snip for MacOS by clicking here. If you run into any problems during the installation process, check out the step-by-step installation guide.
2. Run the app
Once the app is downloaded, double-click the Snip icon to run the app.
Snip is a system tray app, which means you will find it in your system tray (at the top right of your screen), rather than in your Dock.
3. Log in
Before you can start using the app, you must Log in with your Mathpix Snip account. If you don’t have an account yet, click here to create an account. A full guide for creating your account can be found here.
Once you have successfully created an account, go back to the app’s Log in screen and enter the email and password (case sensitive) that you signed up with. If the Log In button is disabled that means you haven’t entered a proper email or password. If you forgot your password and need to reset it, click Forgot? to send a password reset link to your email.
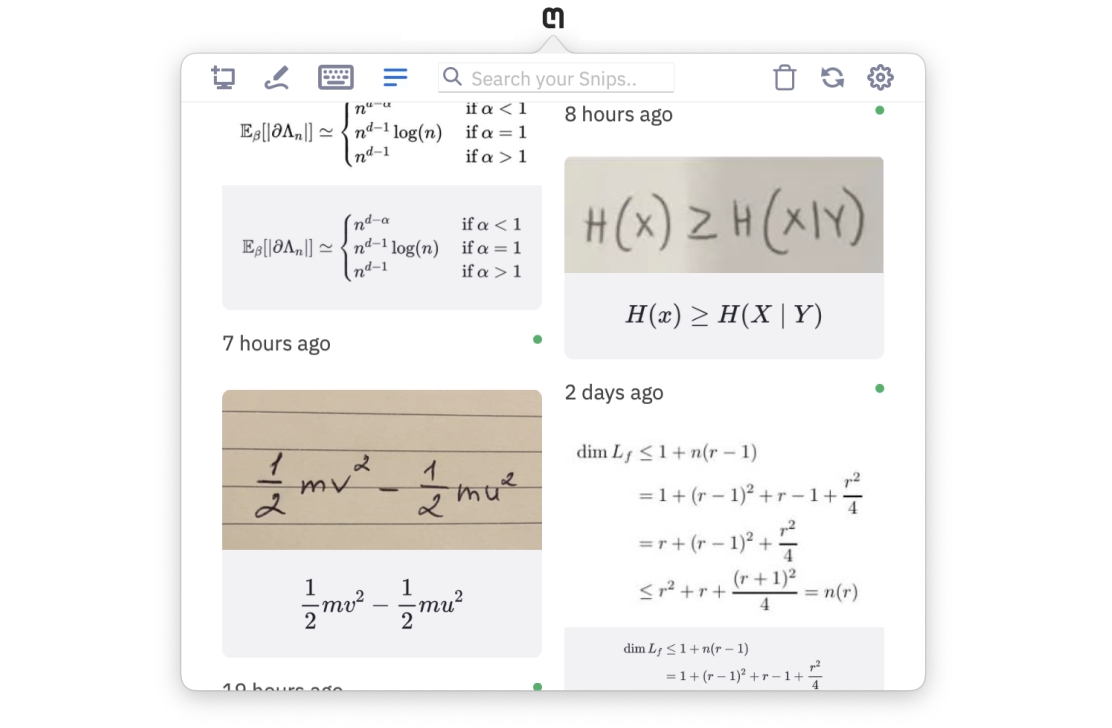
Once you have entered your email address and password and successfully logged in, you will see your Snip List. If this is your first time using the app, the List will be empty and instead, you will see this message explaining how to take your first Snip.
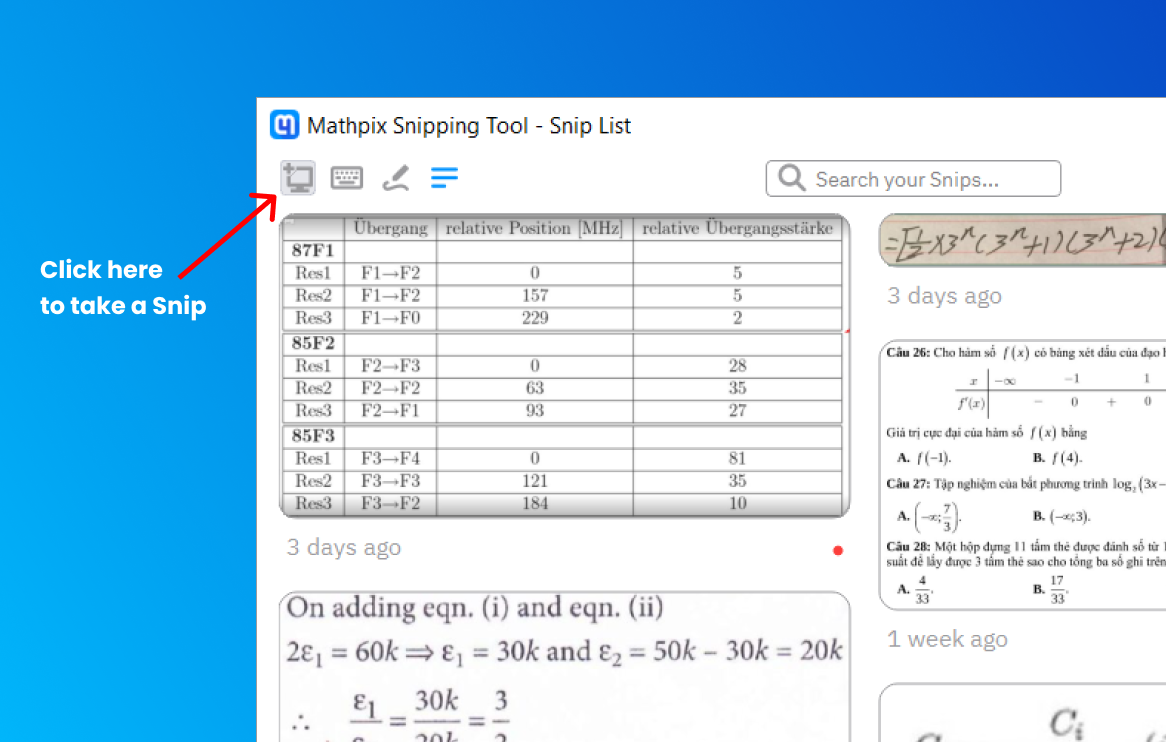
4. Taking a Snip
To create a Snip on your Mac, you are going to take a screenshot, so make sure whatever you want to capture is already on your screen.
You have two options to trigger the screenshot:
- Click the Screenshot button in the top left corner of the app.
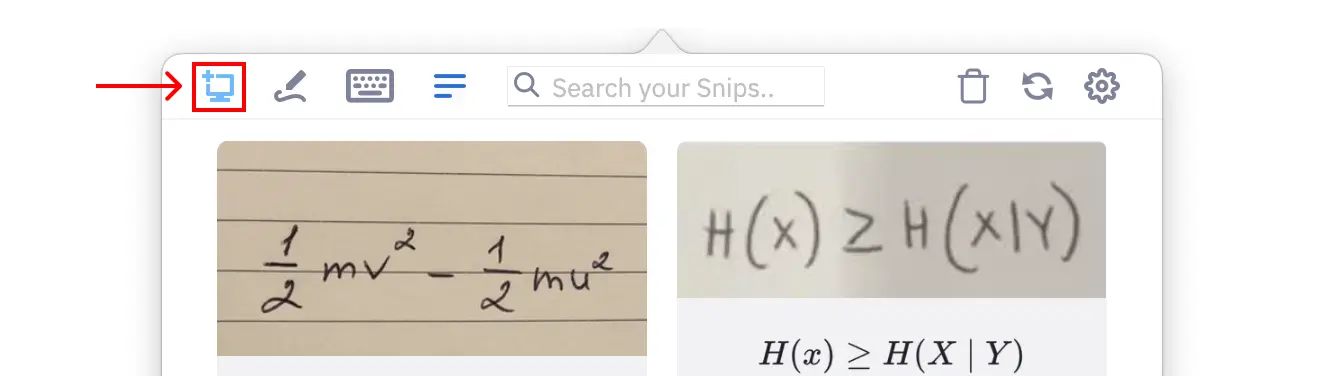
- Enter the keyboard shortcut (
CTRL+⌘+M) anytime the app is running on your computer.
After either clicking the Screenshot button or entering the keyboard shortcut, your screen will turn gray and you will need to click and drag your cursor to capture the desired area of your screen. Release to capture the content inside of the box. Your result will automatically appear in the app.
If you triggered the screenshot mechanism accidentally, you can exit the screenshot mode by clicking once or hitting
esc on your keyboard.5. Using a Snip result
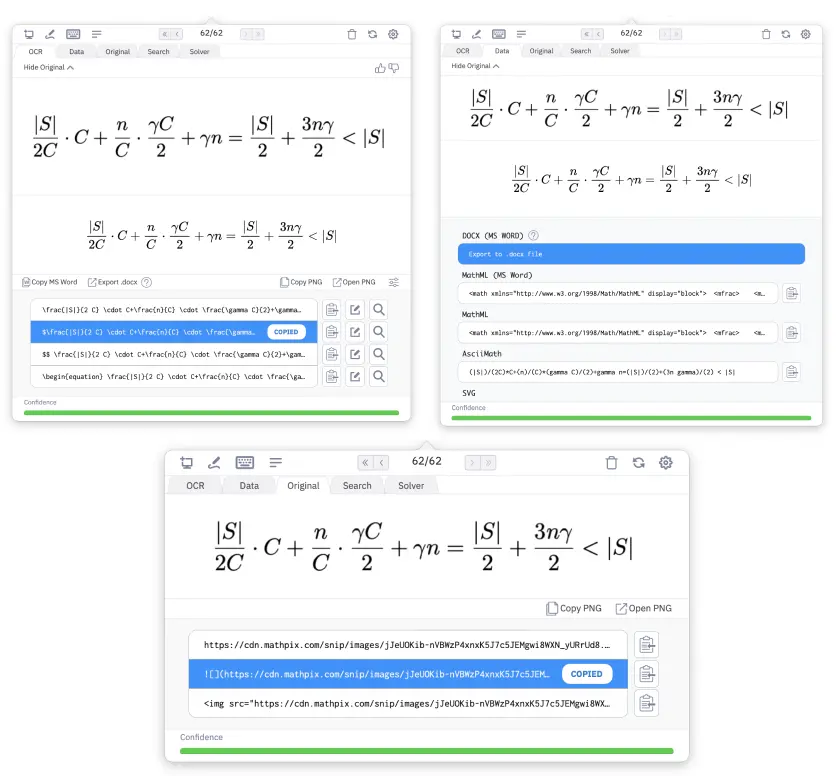
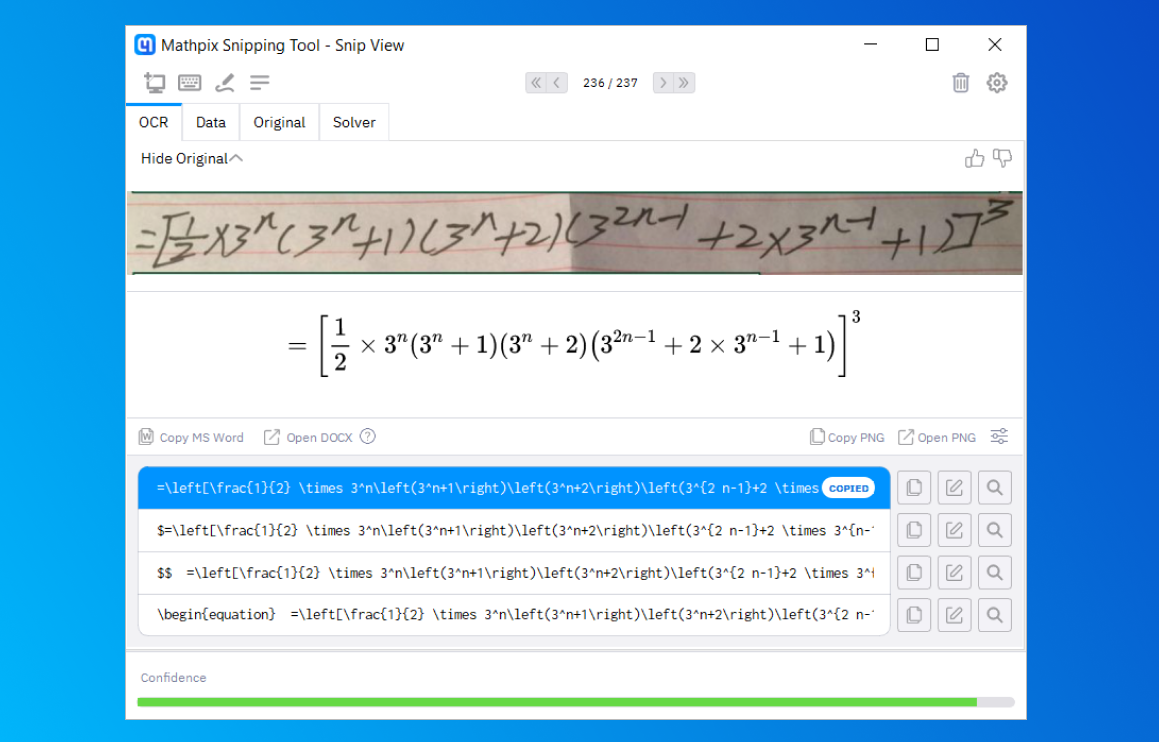
Snip can be used in many different ways, but the main function is digitizing the math and text within an image into different formats that can be used in documents or on the web. If this is your use case, then you want to use the OCR, Data, or Original tabs.
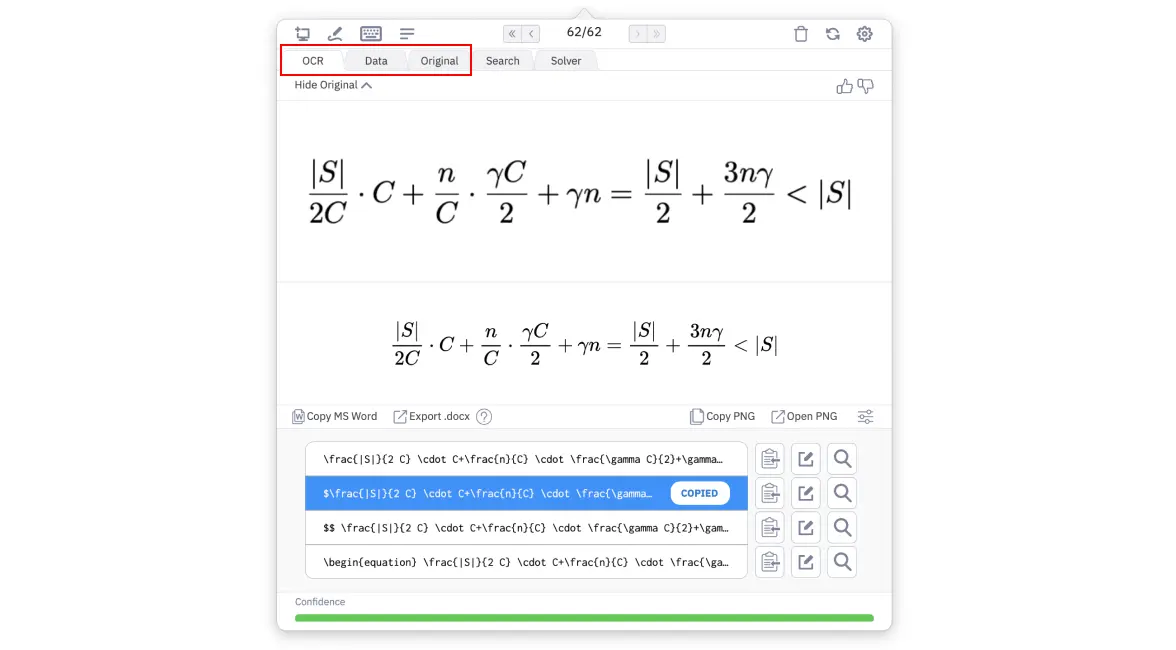
Snip returns many different text formats of results:
- LaTeX (best for editors that support LaTeX)
- Raw LaTeX (best for Notion)
- Inline LaTeX (for inline math)
- Block mode LaTeX numbered and non-numbered (for block mode math)
- Text & mixed text/LaTeX (best for LaTeX & Markdown editors)
- MS Word optimized MathML (best for MS Word)
- MathML (many applications)
- Asciimath (best for computation)
- SVG code (best for websites)
- HTML tables (best for web & Markdown)
- TSV tables (best for spreadsheet software)
- PNG (best for WYSIWYG editors)
- TIFF (best for design software)
- Image URLs (best for HTML pages like blogs)
- Raw URL (best for sharing images in messaging & documentation tools)
- Markdown link (best for Markdown editors)
- HTML
<img>tag (best for websites)
All formats can be easily copied to your clipboard by toggling between the tabs and rows with your up and down arrow keys. Whichever format row is selected will be copied to your clipboard automatically, so all you need to do is paste it into your workflow.
You can customize which format rows appear in the app or your desired LaTeX delimiters by going to Preferences > Formatting.

The formats are spread across 3 tabs:
- OCR: text and LaTeX, PNG/TIFF of the rendered result
- Data: alternative text formats
- Original: Image URLs or PNG/TIFF of the original image
6. Convert PDFs
It’s possible to upload multiple files and choose from a variety of formats to convert them into (DOCX, LaTeX, HTML, Markdown, and Mathpix Markdown).
- Navigate to the new Convert PDF tab.
- Upload your PDFs by dragging and dropping them or using the upload button.
- Select the format you wish to convert your PDFs to.
- Click Convert & Download to export your converted files as a zip file directly to your device.
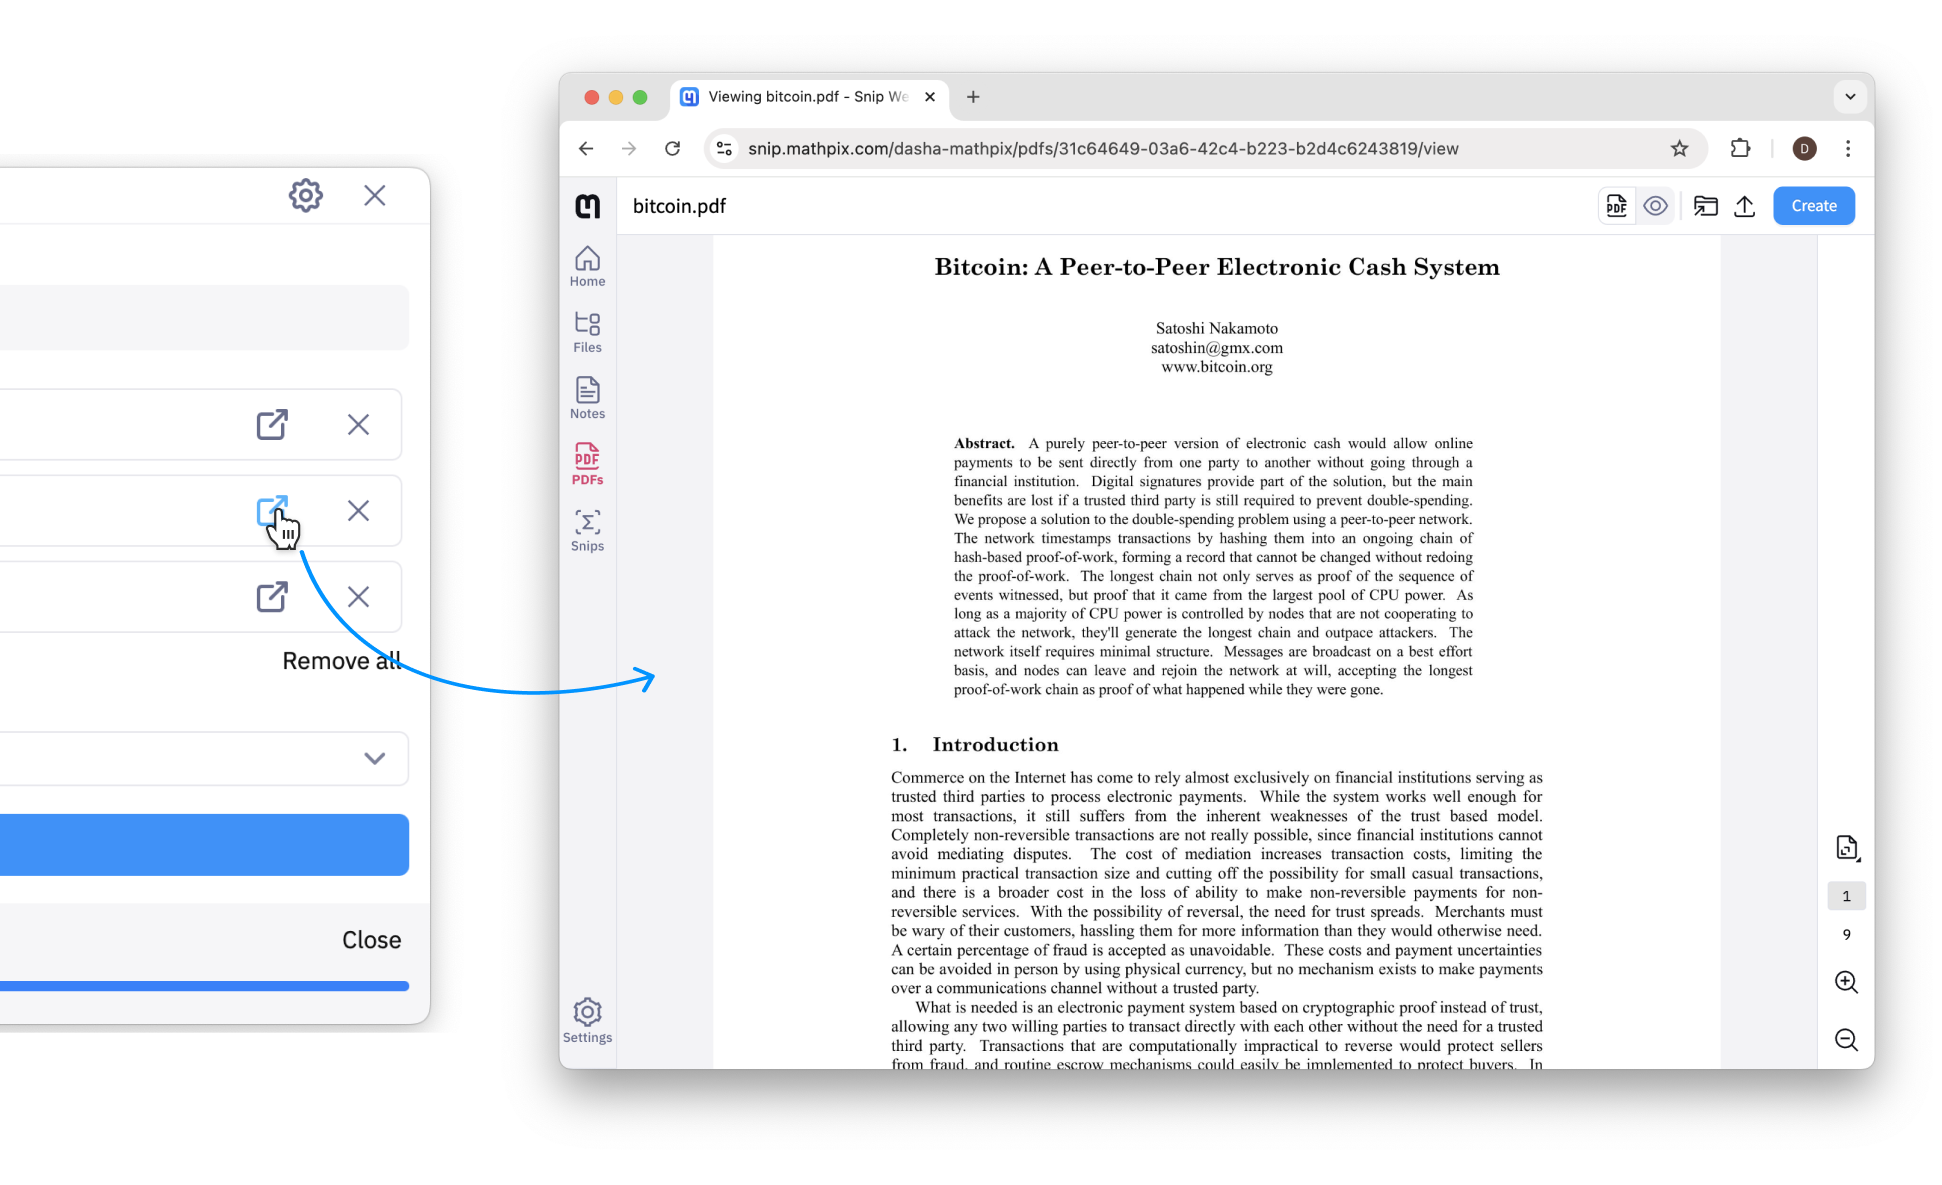
Click the Open in Snip Web icon to the right of each PDF name to open it directly in our web app, where you can view, read, edit, and search through your documents.
Learn More
You now know everything you need to start digitizing images and creating documents with Snip. For an in-depth guide to using all of the features in Snip, click here.
Shortcuts
Global shortcuts (use them at any time):
CTRL + ⌘ + M: Take a screenshot*
CTRL + ⌘ + O: Open the app window*
CTRL + ⌘ + L: Open Snip editor (LaTeX mode)*
CTRL + ⌘ + N: Open Snip editor (Markdown mode)*
⌘ + Q: Quit Snip
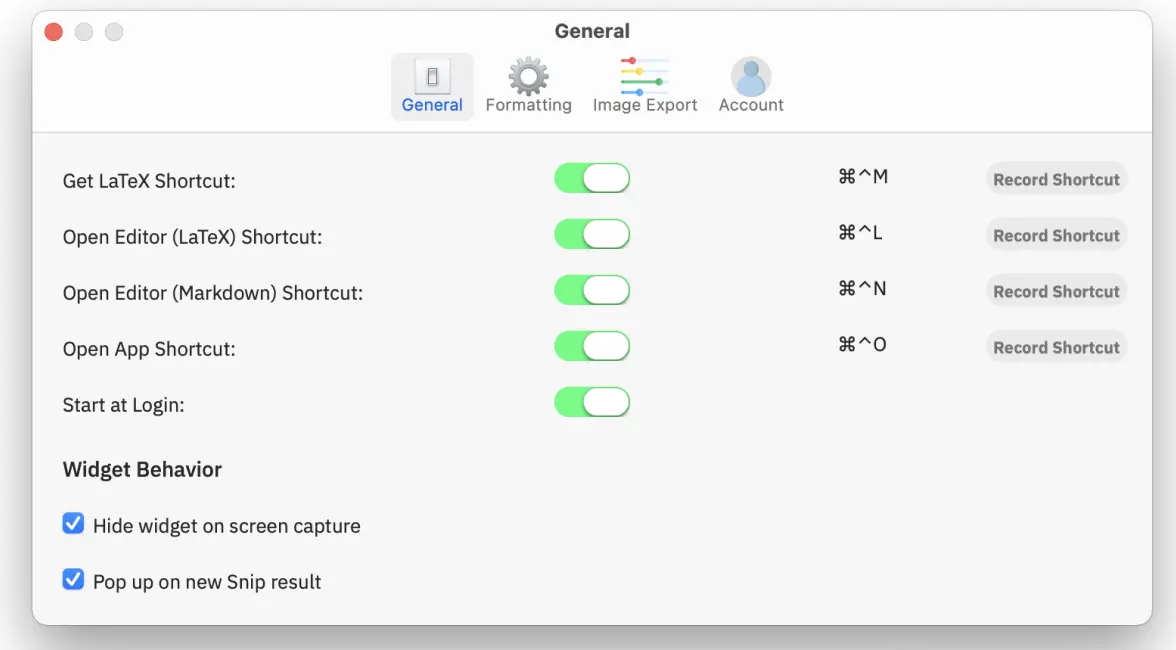
*This shortcut is configurable in Preferences > General
When viewing a Snip result:
Up arrow key and Down arrow key: Change selected format
SHIFT + Up arrow key and SHIFT + Down arrow key: Change tabs
Left arrow key: View previous Snip
Right arrow key: View next Snip
SHIFT + Left arrow key: View oldest Snip
SHIFT + Right arrow key: View most recent Snip
ENTER: Edit selected format row
DELETE: Delete current Snip
When editing or writing a Snip:
ENTER: Create a new line
SHIFT + ENTER or CTRL + ENTER: Save changes
User guide
This is an in-depth guide to all of the features that you can use in Snip. For more information about downloading the app and creating your Mathpix account, click here.
Taking a Snip
To create a Snip on your Mac, you are going to take a screenshot, so make sure whatever you want to capture is already on your screen.
You have two options to trigger the screenshot:
- Click the Screenshot button in the top left corner of the app.
- Enter the keyboard shortcut (
CTRL+⌘+M) anytime the app is running on your computer.
After either clicking the Screenshot button or entering the keyboard shortcut, your screen will turn gray and you will need to click and drag your cursor to capture the desired area of your screen. Release to capture the content inside of the box. Your result will automatically appear in the app.
If you triggered the screenshot mechanism accidentally, you can exit the screenshot mode by clicking once or hitting
esc on your keyboard.Uploading image(s)
Unlike the screenshot OCR feature, this method is especially useful for handling multiple images at once.
- On the app interface, locate and click the “Upload Image” button.
- A file dialog will open. Select one or multiple images from your device to upload.
- Once uploaded, all images are automatically processed and converted.
The converted images will be added to your collection within the app for further use.
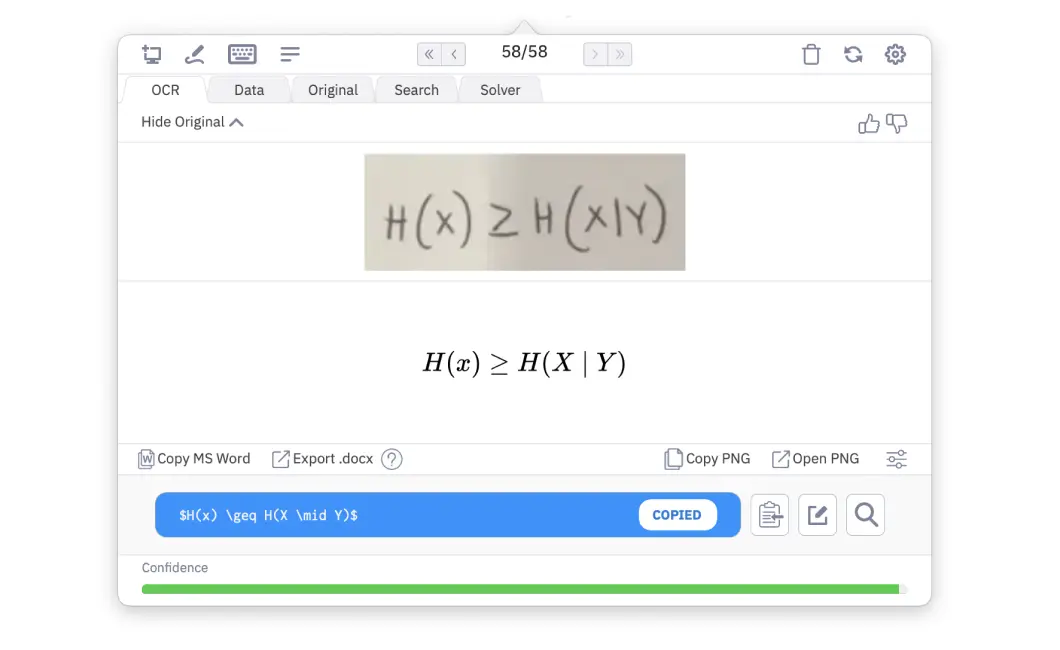
Using a Snip result
Snip can be used in many different ways, but the main function is digitizing the math and text within an image into different formats that can be used in documents or on the web. If this is your use case, then you want to use the OCR, Data, or Original tabs.
Snip returns many different text formats of results:
- LaTeX (best for editors that support LaTeX)
- Raw LaTeX (best for Notion)
- Inline LaTeX (for inline math)
- Block mode LaTeX numbered and non-numbered (for block mode math)
- Text & mixed text/LaTeX (best for LaTeX & Markdown editors)
- MS Word optimized MathML (best for MS Word)
- MathML (many applications)
- Asciimath (best for computation)
- SVG code (best for websites)
- HTML tables (best for web & Markdown)
- TSV tables (best for spreadsheet software)
- PNG (best for WYSIWYG editors)
- TIFF (best for design software)
- Image URLs (best for HTML pages like blogs)
- Raw URL (best for sharing images in messaging & documentation tools)
- Markdown link (best for Markdown editors)
- HTML
<img>tag (best for websites)
All formats can be easily copied to your clipboard by toggling between the tabs and rows with your up and down arrow keys. Whichever format row is selected will be copied to your clipboard automatically, so all you need to do is paste it into your desired app.
You can customize which format rows appear in the app or your desired LaTeX delimiters by going to Preferences > Formatting.
The formats are spread across 3 tabs:
- OCR: text and LaTeX, PNG/TIFF of the rendered result
- Data: alternative text formats
- Original: Image URLs or PNG/TIFF of the original image
Editing a Snip
If your Snip result did not get recognized 100% accurately, you can edit the source to make it perfect!
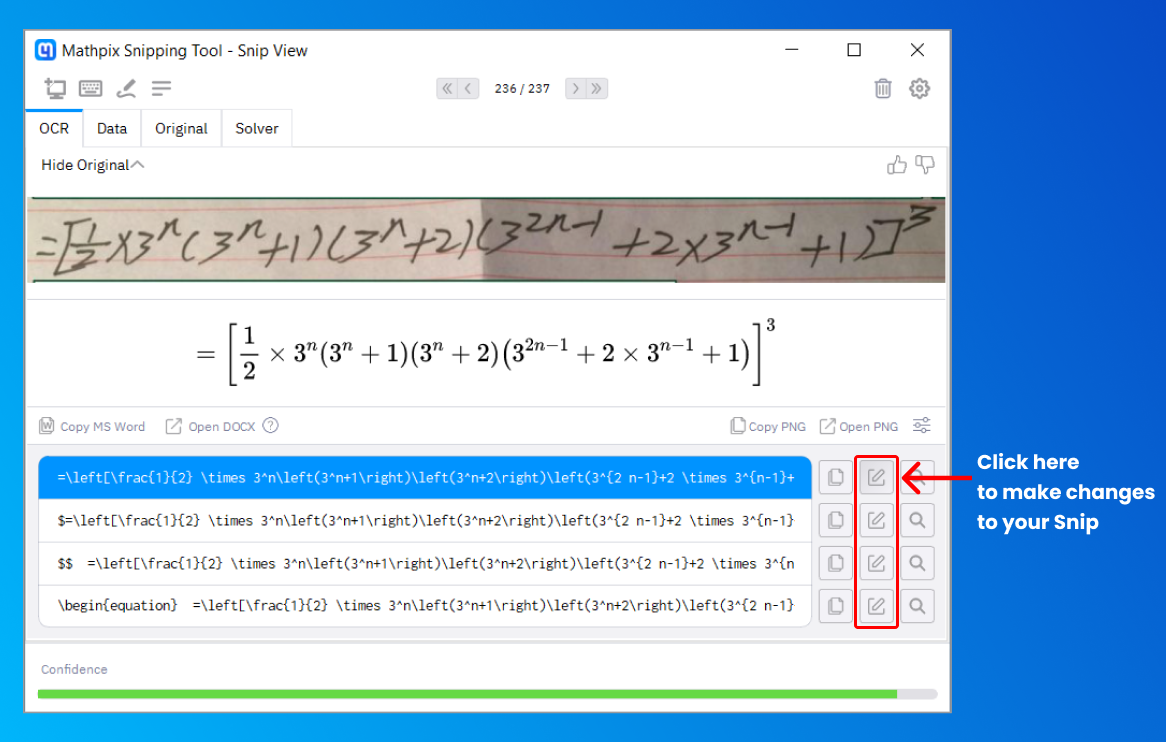
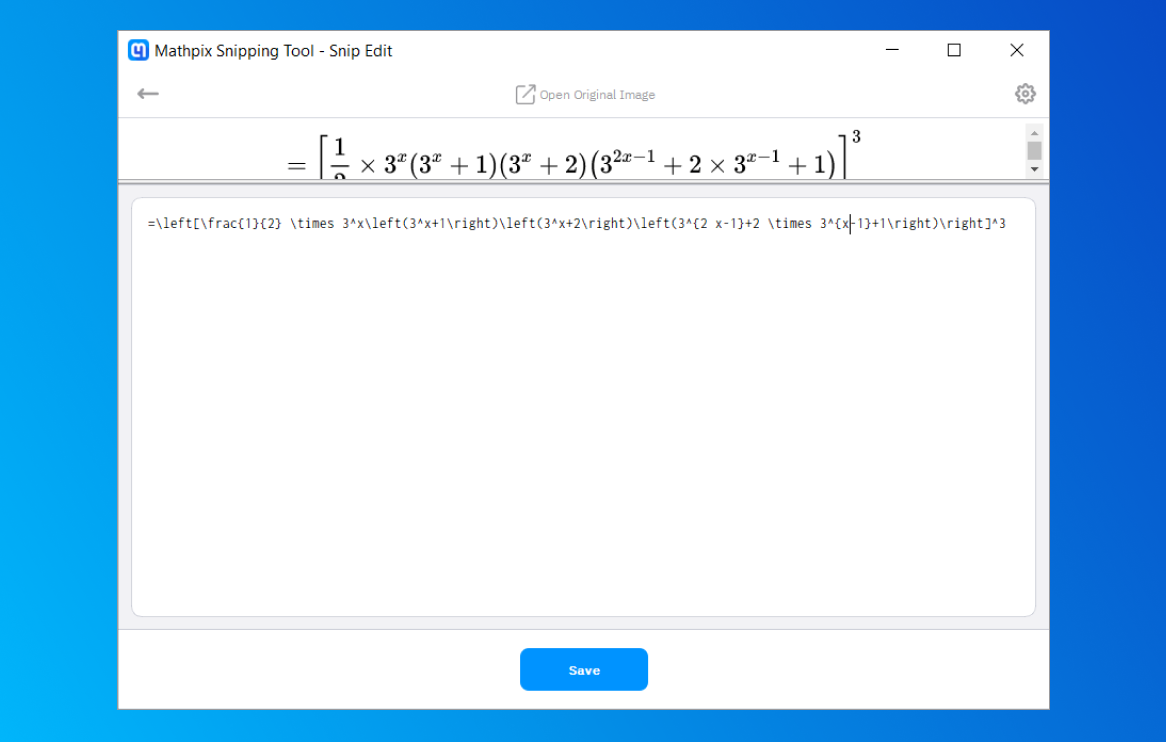
First, click the Edit button (it looks like a pen) on your desired format row. (NOTE: if you edit the text mode (second) row, you will lose the math mode rows)
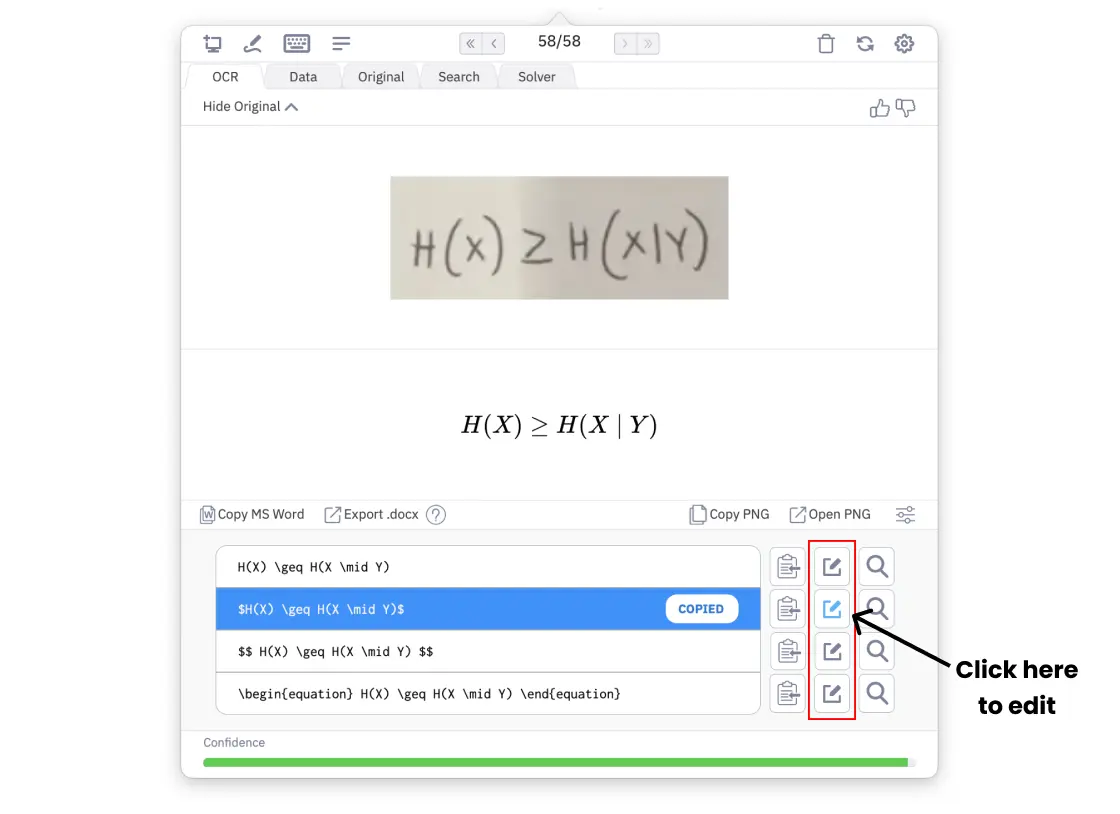
Make your changes in the text box, you will see the changes rendered instantly in the preview above. Once you have your desired result, click Save:
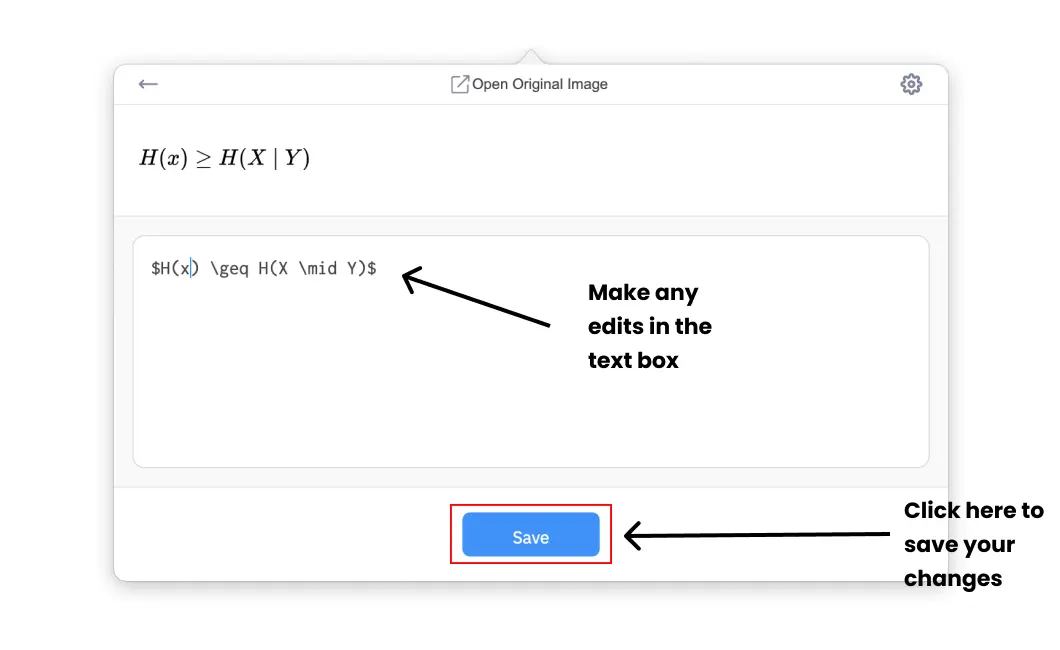
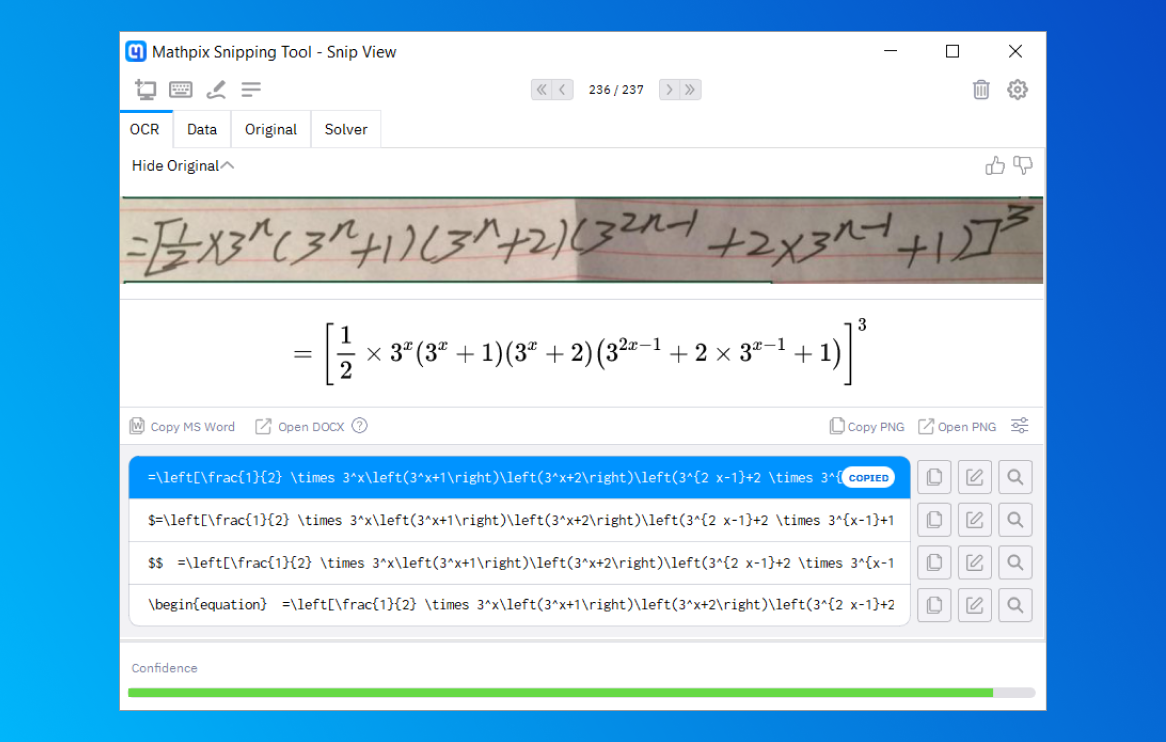
Your Snip will update instantly and the updated result will be copied to your clipboard!
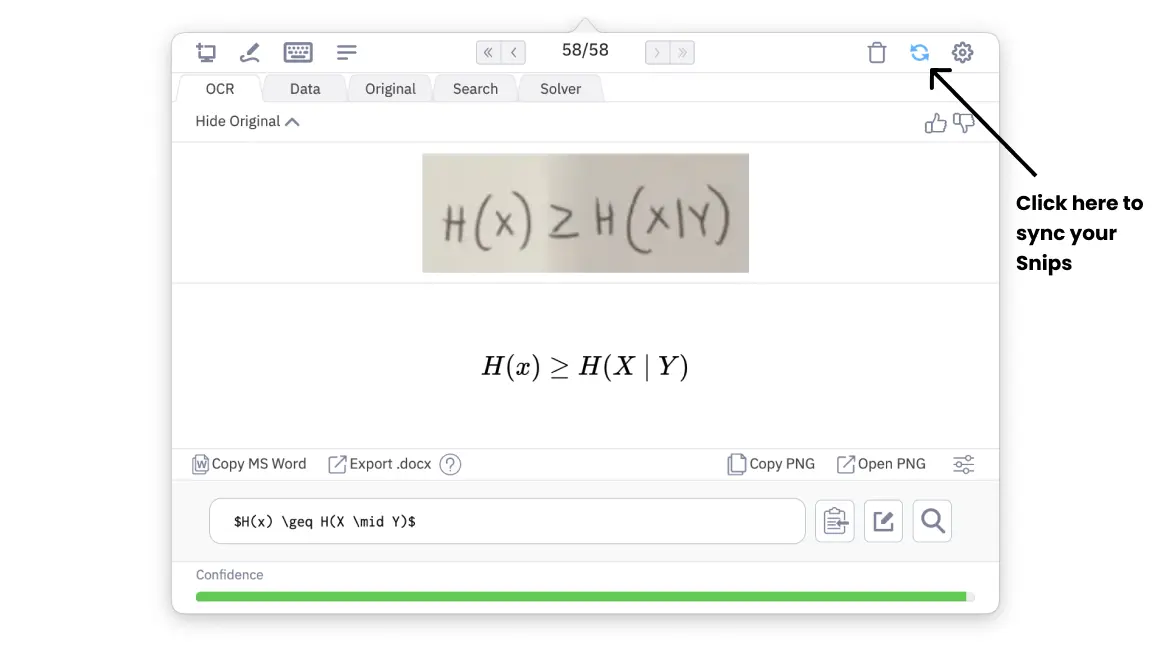
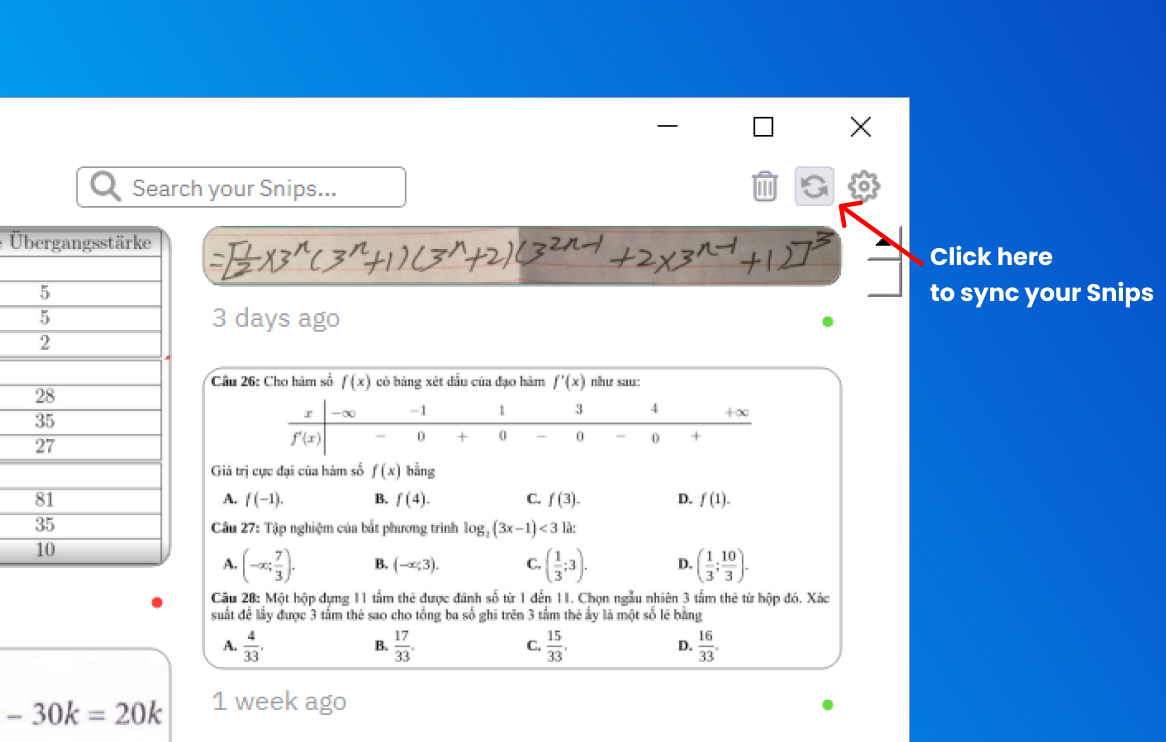
Syncing a Snip
All Snips taken from your account will sync automatically with any Snip app that you are logged into with the same account. Waiting for a Snip to sync? You can force an update by clicking the Sync button on the top right:
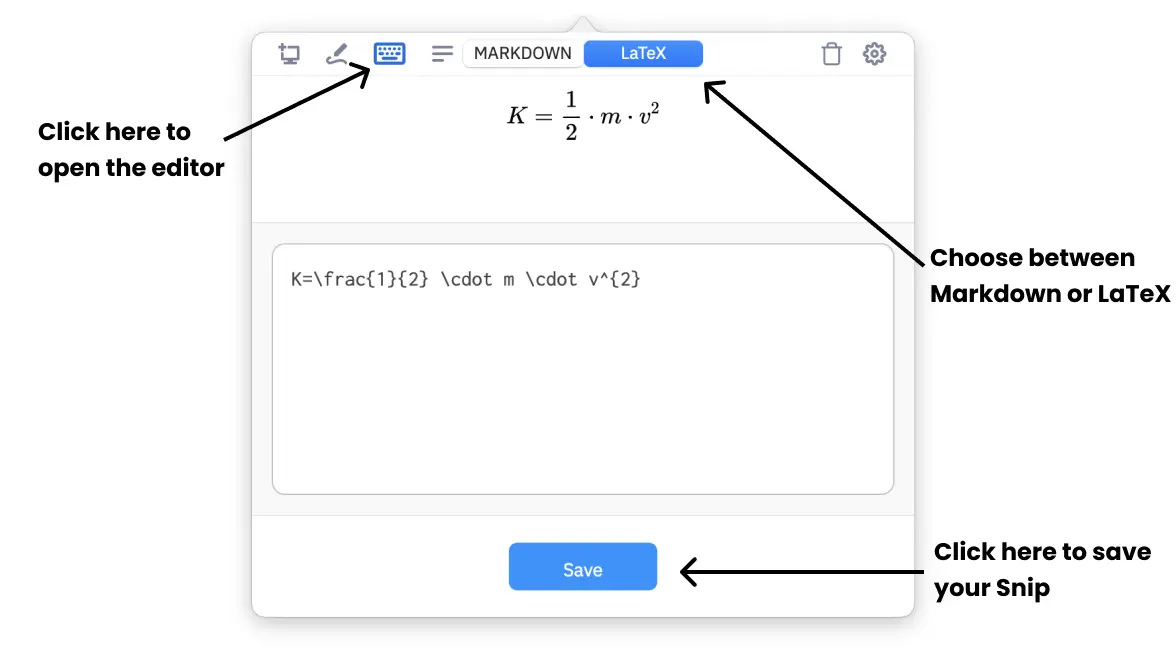
Writing a Snip
Only available in Snip for Mac, we have an additional way of creating a Snip–by writing the Markdown or LaTeX directly. This is a convenient feature for users who need image outputs (PNG or image URL) from raw LaTeX.
Click on the pen icon to open the Snip Editor page. Here you can toggle between Markdown or LaTeX, and start writing your Snip. Once you click save, a new Snip will be created. Note that this Snip will have no “original image” since it has been created from text.
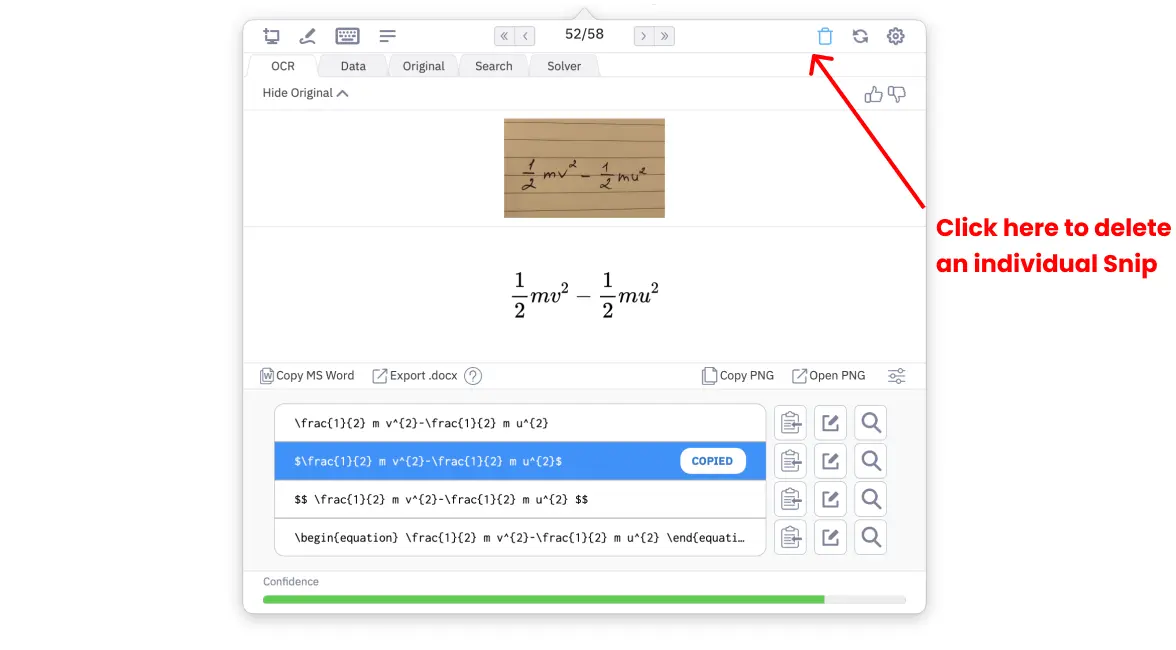
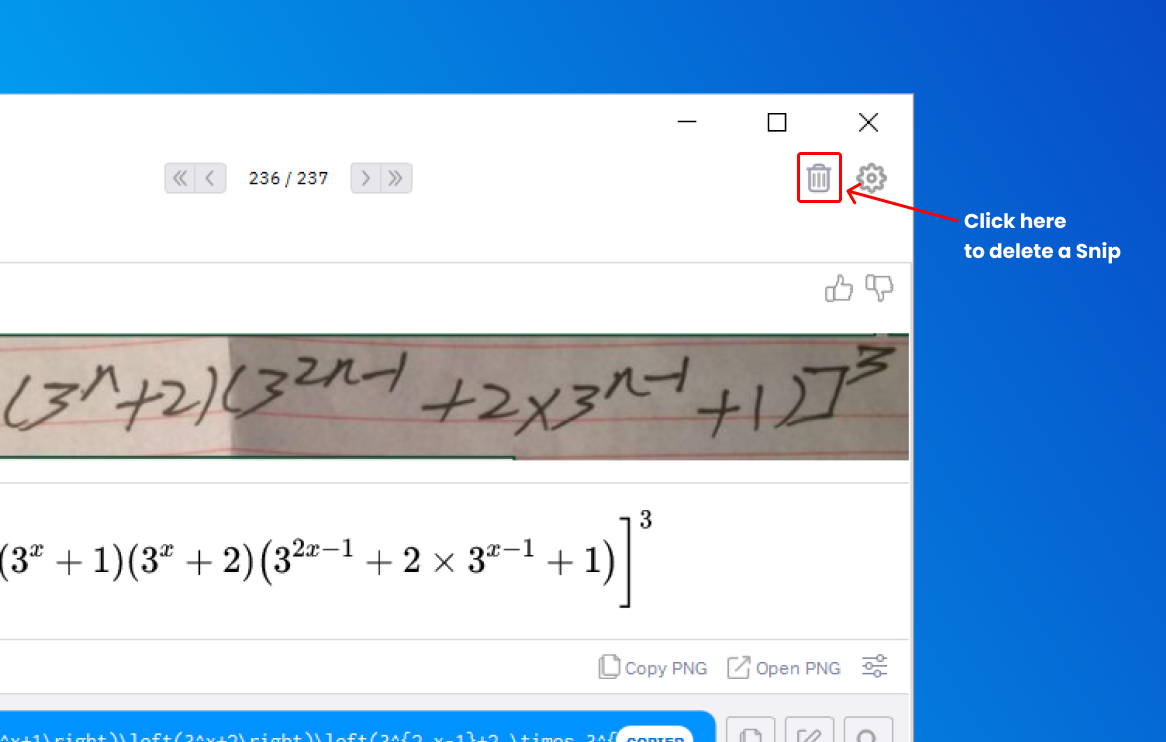
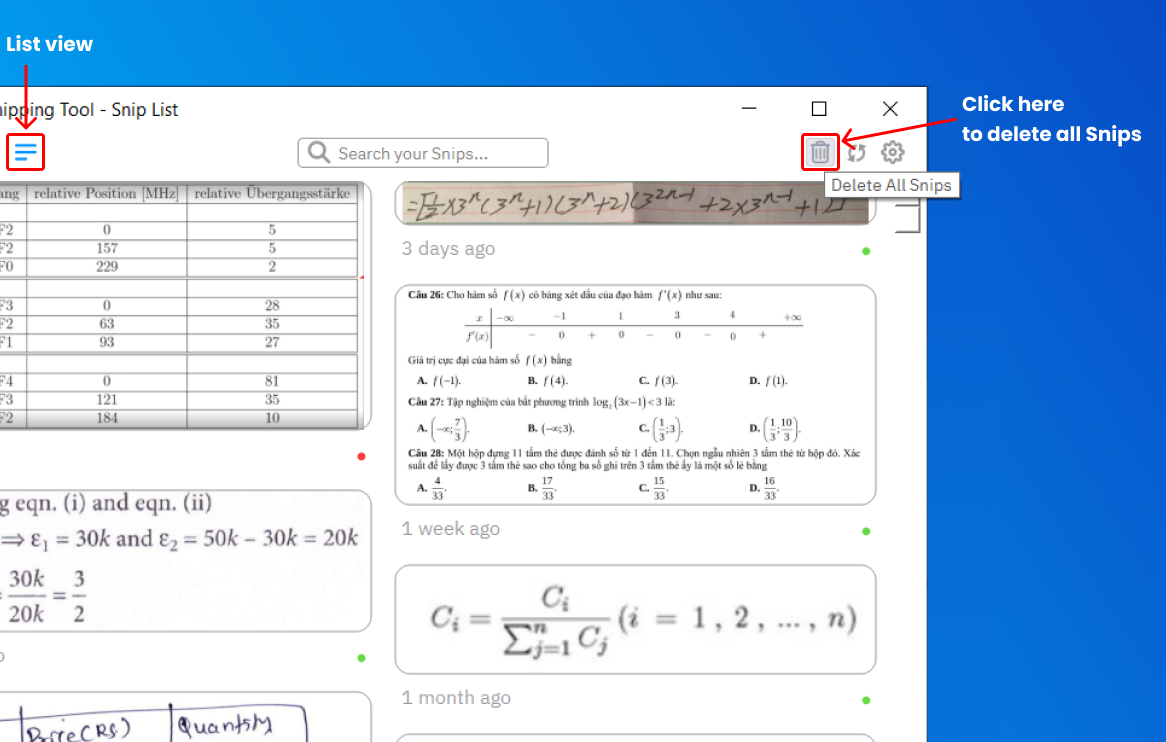
Deleting a Snip
You can delete an individual Snip from that Snip’s result page:
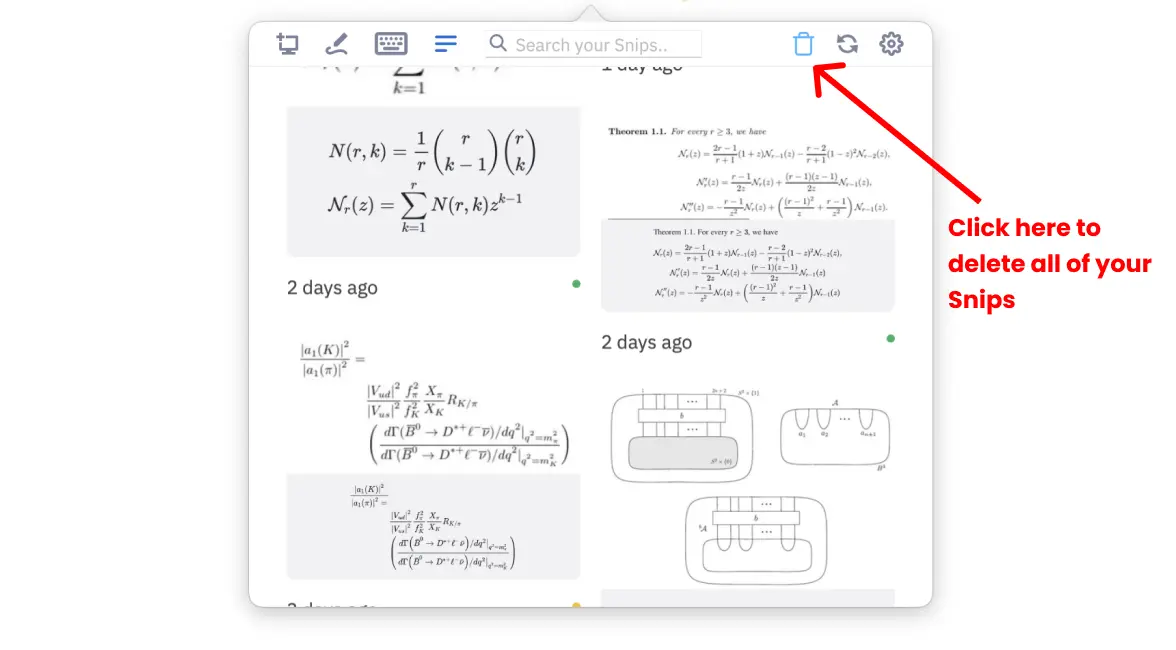
You can delete all of your Snips from your Snip List page:
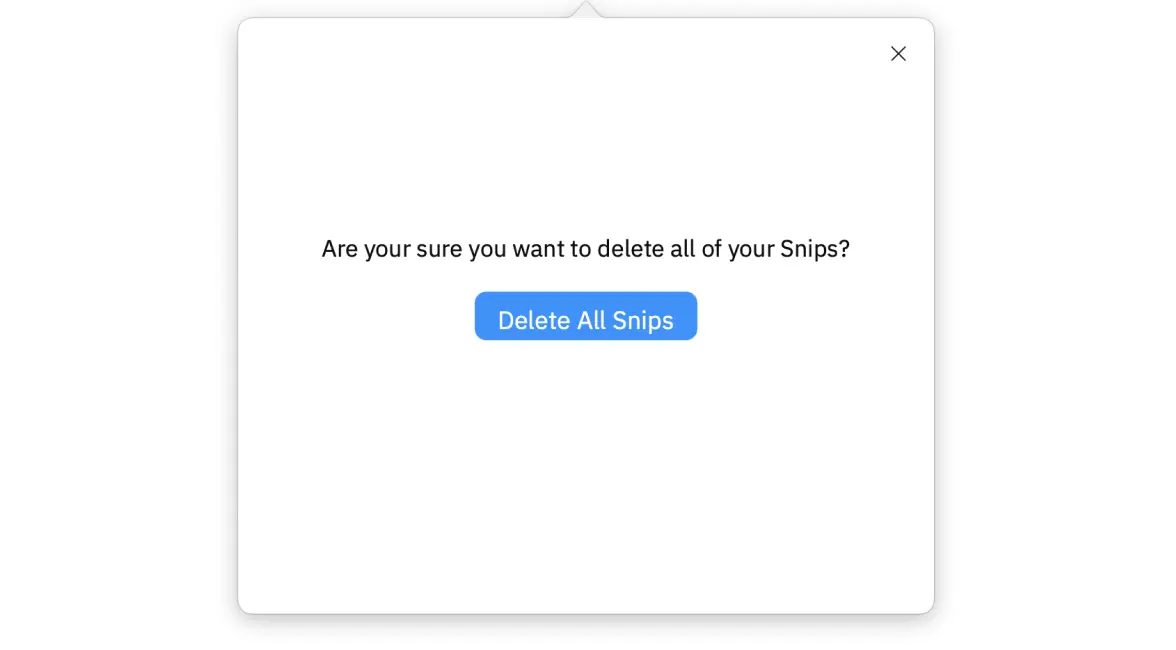
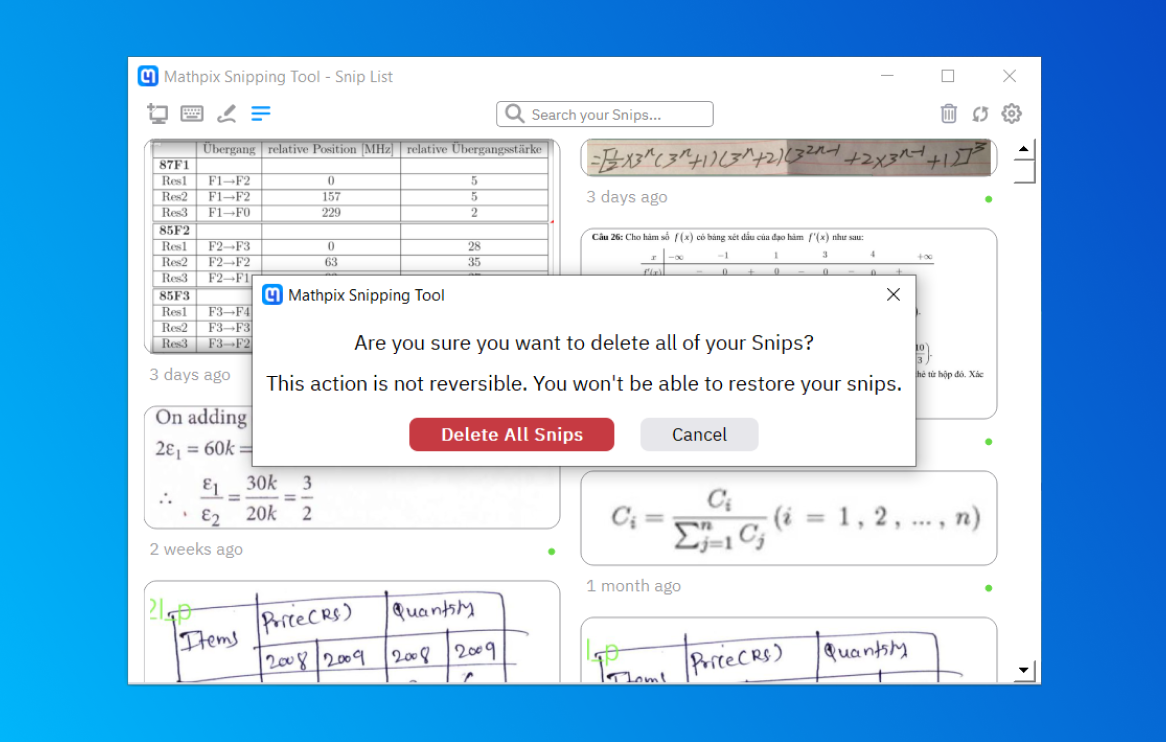
When you click the delete all Snips button, you will be asked to confirm that you want to delete all of your Snips (since this is an irreversible action). Click the Delete All Snips button to confirm, or the X to cancel.
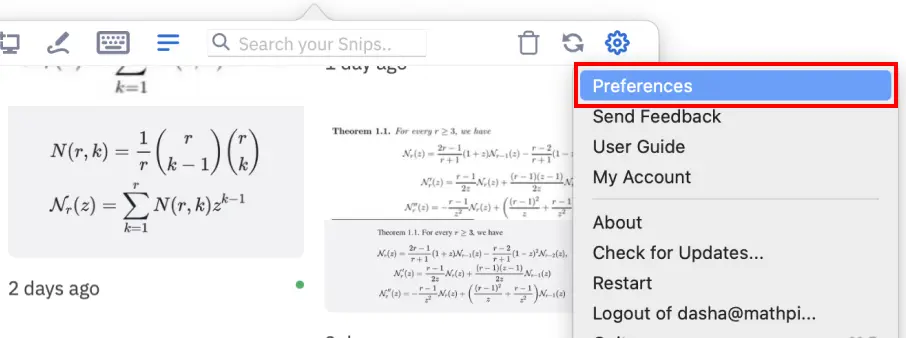
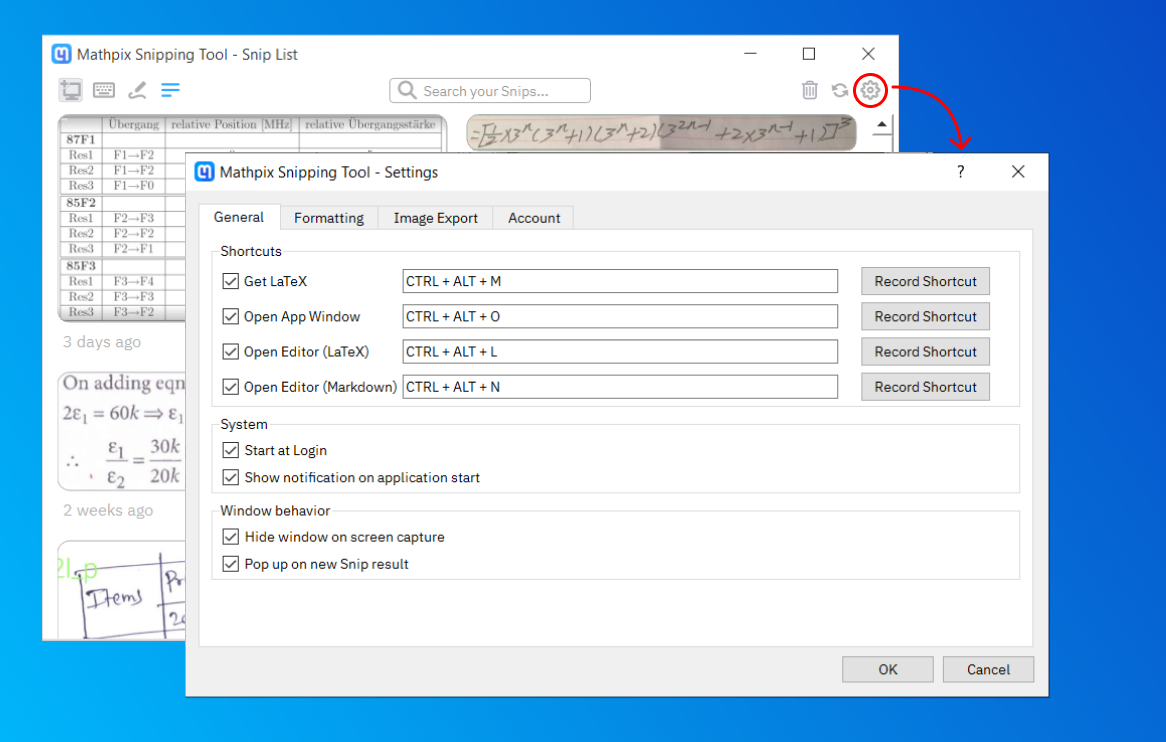
Changing your settings
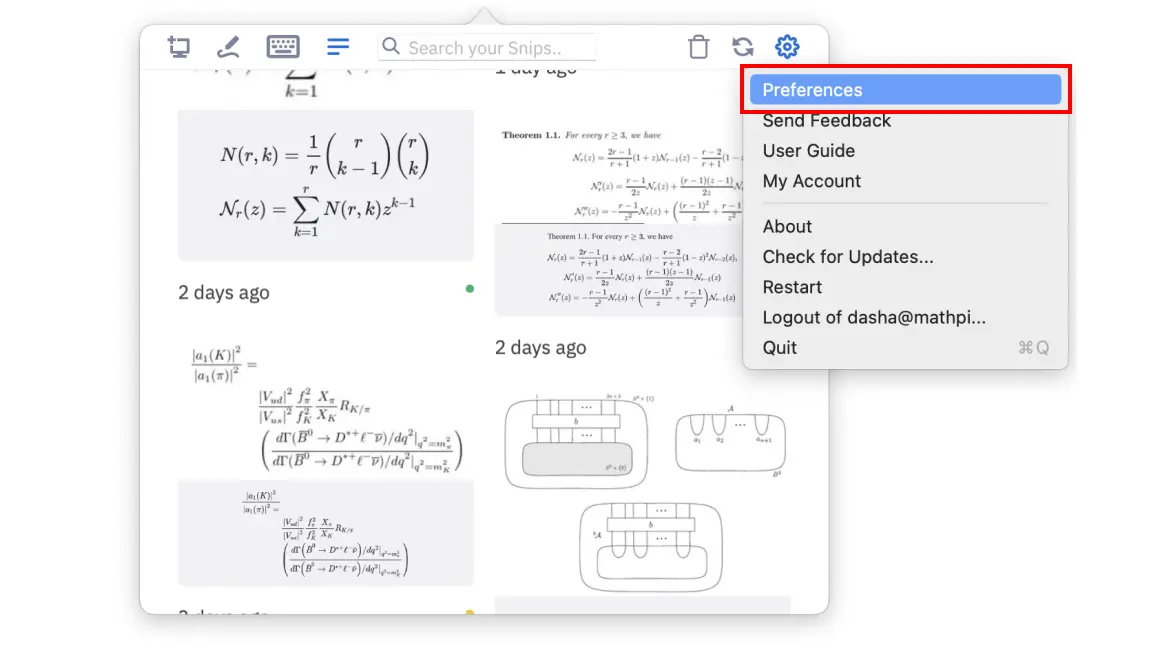
To access the app Preferences, click on the Settings wheel at the top right corner of the app, then choose Preferences from the menu:
Go to Preferences > General to customize:
- all keyboard shortcuts
- if you want Snip to start at Log in
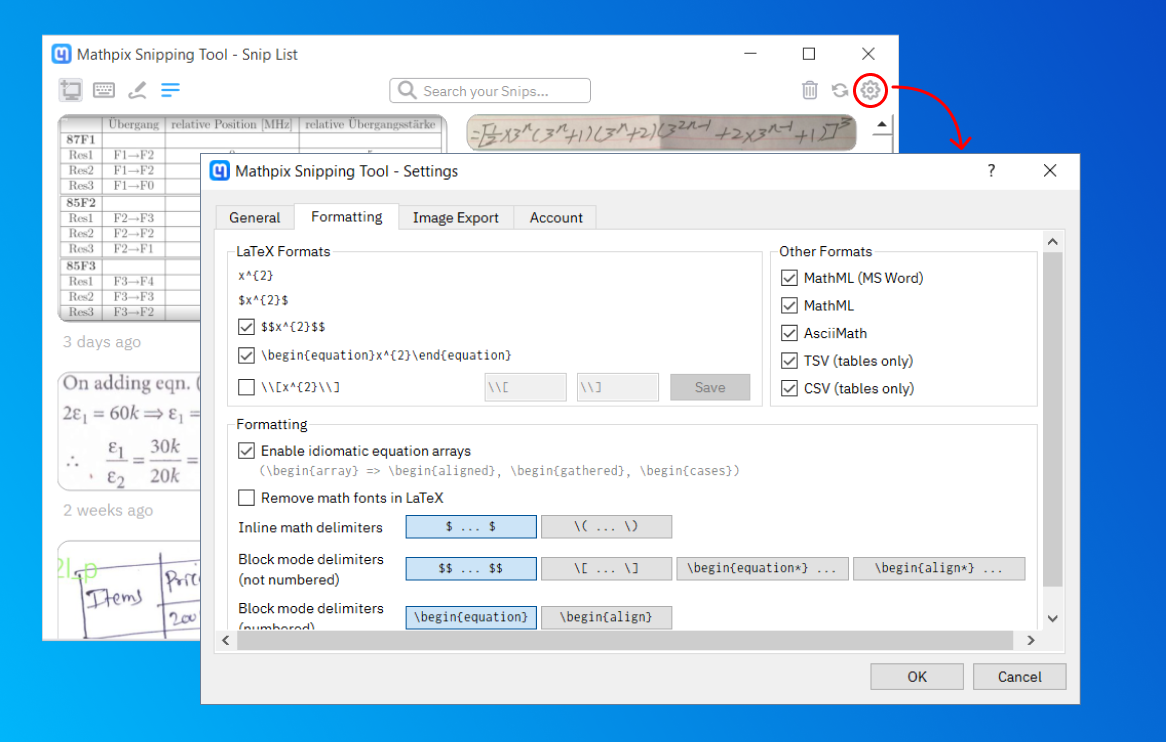
Go to Preferences > Formatting to customize:
- which format rows display in your app
- your desired math mode LaTeX delimiters
- whether or not to include extra spaces in your LaTeX
Quitting Snip
You can quit Snip at any time by clicking on the Settings wheel to open the menu, and then choosing Quit. You can also enter
⌘+Q on your keyboard whenever the app is active to quit.Windows
Installing the app
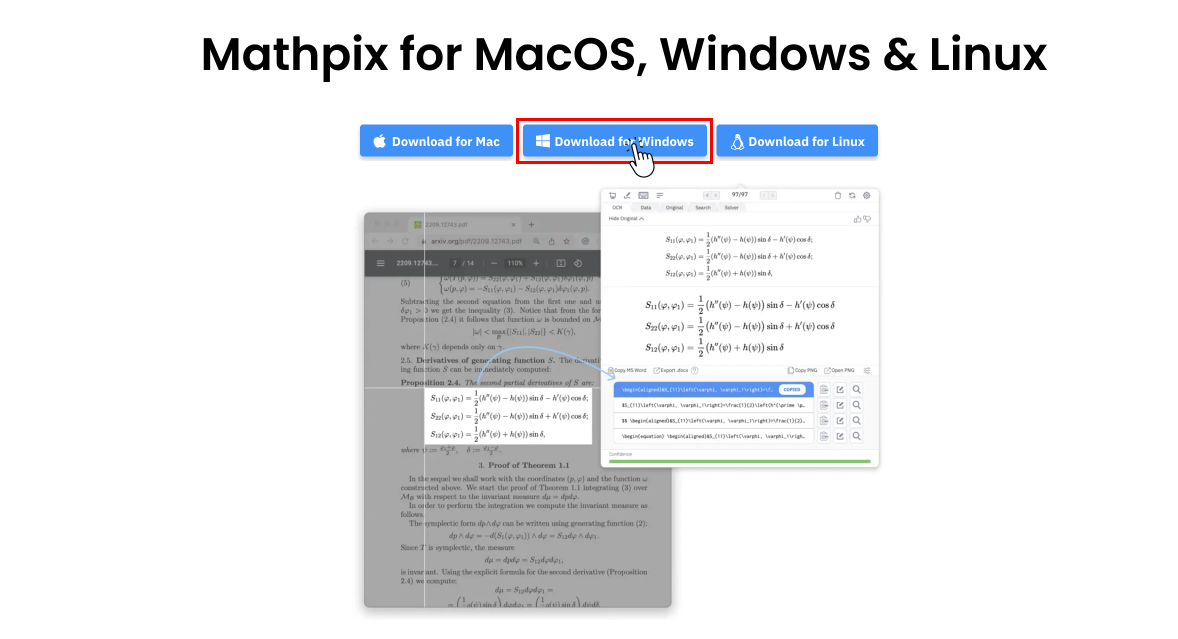
Follow these easy steps to download the Windows app straight from our website!
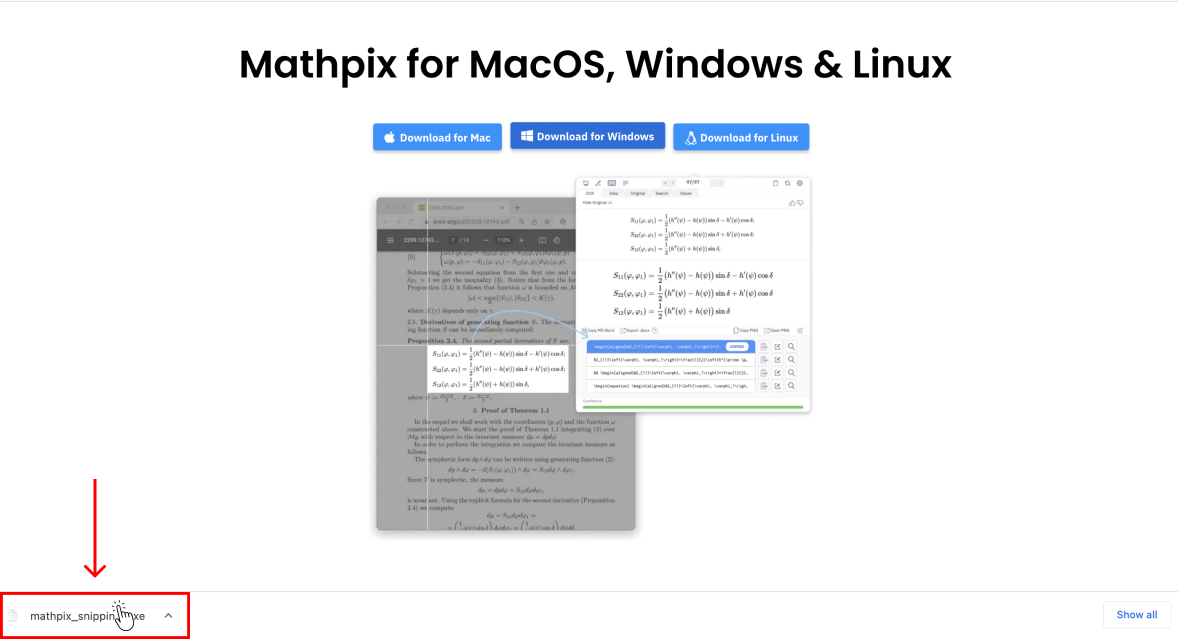
1. Click the Windows button to instantly start your download. You will be able to see the download progress at the bottom of your browser window:
2. Once the download is complete, click to open the file.
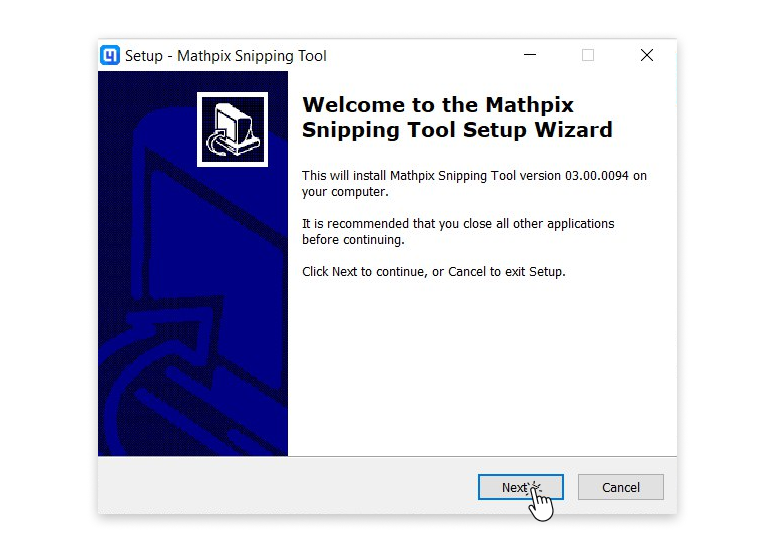
3. The Setup Wizard will appear on your screen to take you through the installation. Click Next to begin:
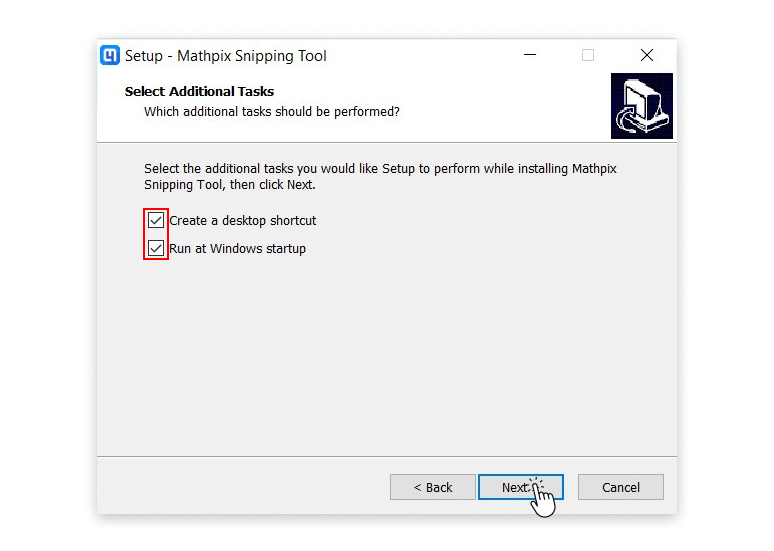
4. Here you will have the option to add a Snip shortcut to your desktop (recommended for ease of access!). You can also choose to have Snip open with Windows (recommended if you’ll be Snipping regularly).
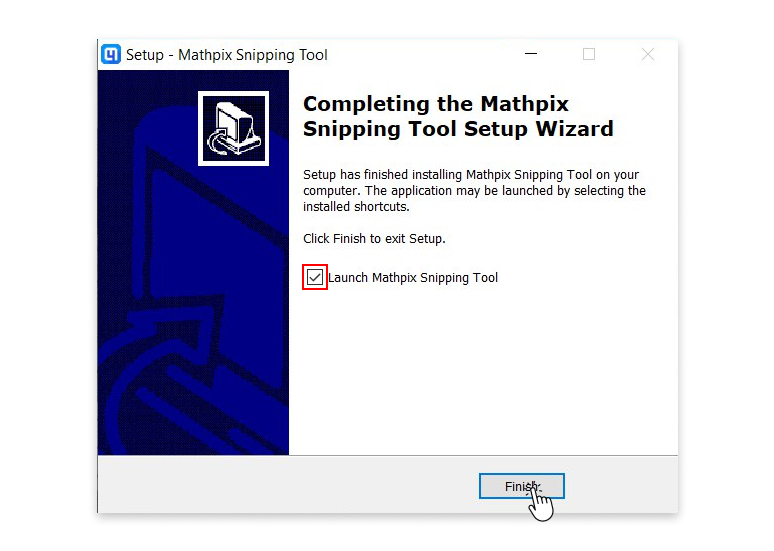
5. It will take just a few moments for Snip to install. Once complete, click Finish (leave the box checked if you want to start using Snip right away):
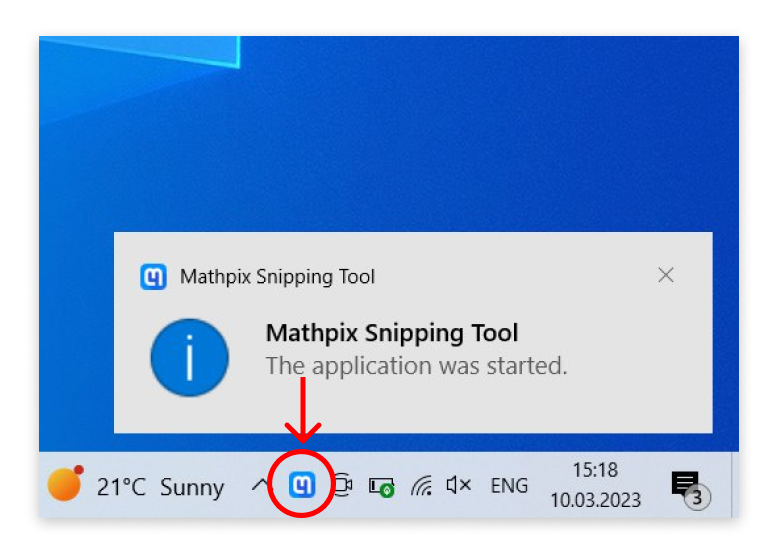
6. Next, you will see a notification telling you that the app has started running. You can start using the app by clicking the Mathpix icon in your system tray!
Shortcuts
Global shortcuts (use them at any time):
CTRL + ALT + M: Take a screenshot*
CTRL + ALT + O: Open the app window*
CTRL + ALT + L: Open Snip editor (LaTeX mode)*
CTRL + ALT + N: Open Snip editor (Markdown mode)*
⌘ + Q: Quit Snip
*This shortcut is configurable in Preferences > General
When viewing a Snip result:
Up arrow key and Down arrow key: Change selected format
SHIFT + Up arrow key and SHIFT + Down arrow key: Change tabs
Left arrow key: View previous Snip
Right arrow key: View next Snip
SHIFT + Left arrow key: View oldest Snip
SHIFT + Right arrow key: View most recent Snip
ENTER: Edit selected format row
DELETE: Delete current Snip
When editing or writing a Snip:
ENTER: Create a new line
SHIFT + ENTER or CTRL + ENTER: Save changes
Quickstart guide
This is a brief guide for getting up and running Snip on your Windows computer. It will cover all the main features of the app and how they work.
Install Snip
If you haven’t already, download the Windows app from our website. If you run into any problems during the installation process, check out the step-by-step installation guide.
I’ve started the app, where is it?
You will know that you have successfully started the app when you see this notification on your screen:
If the app is running, you can find it in your system tray.
If you don’t see the Mathpix icon in your system tray, it might be hidden. Try clicking the ^ button to expand your system tray.
If the app window is open on your screen, you will also see the Mathpix icon in your dock.
Logging in with your Mathpix Snip account
Before you can start using the app, you must Log in with your Mathpix Snip account. Don’t have an account yet? You can sign up in the app or at accounts.mathpix.com. A full guide for creating your account can be found here.
Click the Mathpix icon in your system tray to open the Log in screen. Enter the email and password (case sensitive) you signed up with to Log in. If the Log In button is disabled that means you haven’t entered a proper email or password — double check them! If you forgot your password and need to reset it, click Forgot your password? and a reset password link will be sent to your email.
Once you have entered your email address and password and successfully logged in, you will see your Snip List. If this is your first time using the app, the List will be empty and instead, you will see this message: Click here to take a Snip! Or enter
CTRL+ALT+M on your keyboard.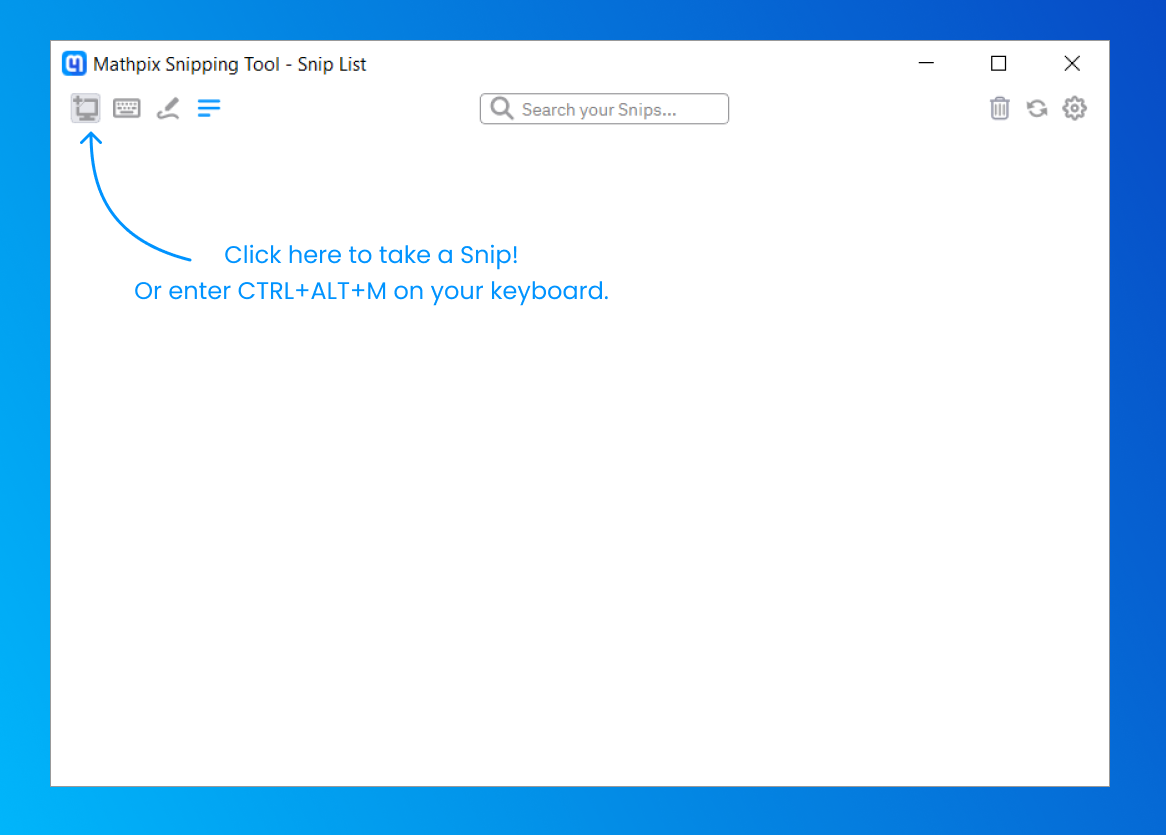
Taking a Snip
There are two ways to take a Snip:
- Click the Screenshot button in the top left corner of the app.
- Enter the keyboard shortcut (
CTRL+ALT+M) anytime the app is running on your computer.
After either clicking the Screenshot button or entering the keyboard shortcut, your screen will turn gray and you will need to click and drag your cursor to capture the desired area of your screen.
Didn’t mean to take a Snip? You can exit the screenshot mode by clicking once.
Syncing a Snip
All Snips taken from your account will sync automatically with any device that you are logged into with the same account. Waiting for a Snip to sync? You can force an update by clicking the Sync button on the top right:
Using a Snip result
Snip gives many different formats of results:
- LaTeX (best for LaTeX editors)
- Mixed text/LaTeX (best for Markdown editors)
- DOCX (best for MS Word)
- PNGs (best for WYSIWYG editors)
- Image URLs (best for HTML pages like blogs)
Text and LaTeX formats can be easily copied to your clipboard by toggling between the formats with your keyboard arrow keys. Whichever format row is selected will be copied to your clipboard automatically, so all you need to do is paste. (You can customize which text and LaTeX rows appear in the app or your desired LaTeX delimiters by going to Settings > Formatting.)
You can copy or open a PNG format of either the original image or of the rendered LaTeX by clicking the buttons beneath the displayed image. Clicking Copy PNG automatically copies the image to your clipboard, while Open PNG will open the file in Preview.
Image URL formats can be found by navigating to the Original tab:
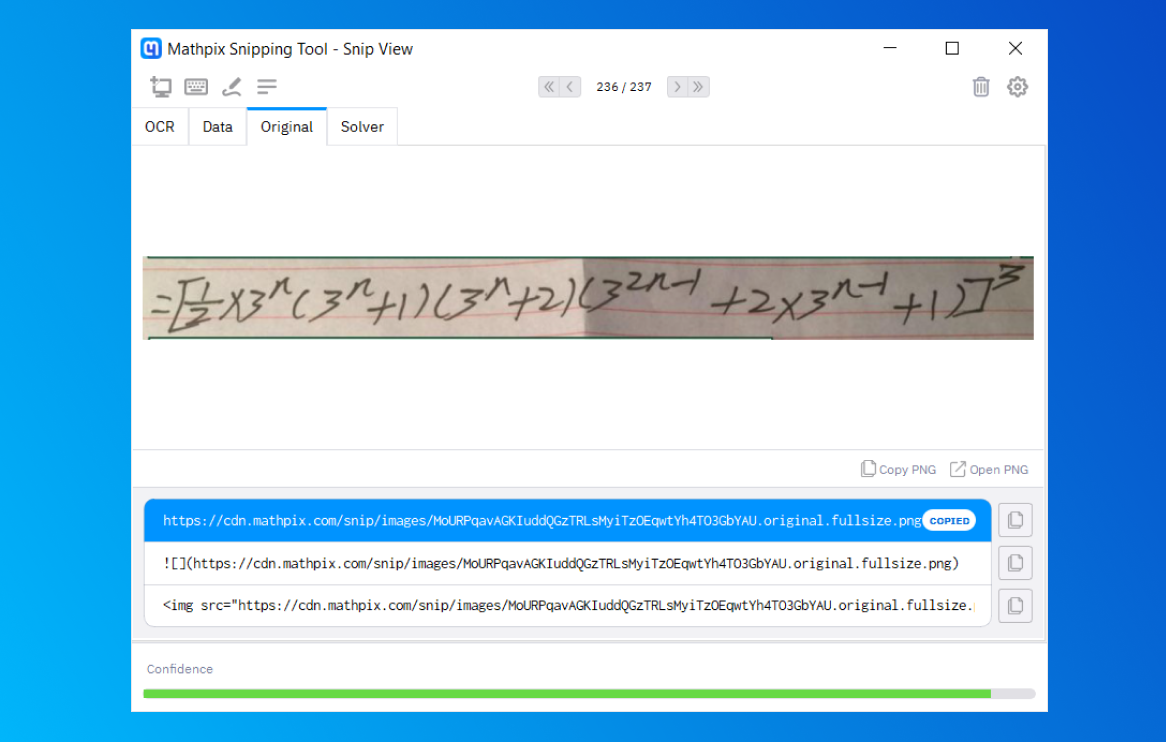
There are three image URL formats:
- URL (best for sharing images in messaging & documentation tools)
- Markdown link (best for Markdown editors)
- HTML
<img>tag (best for websites)
Just like the LaTeX and text format rows, whichever row is selected will be copied automatically to your clipboard.
Editing a Snip
Did your Snip result come back not quite right? You can edit the source to make it perfect!
First, click the Edit button (it looks like a pen) on your desired format row. (NOTE: if you edit the text mode (second) row, you will lose the math mode rows)
This will open the Snip editor. Make your changes in the text box, you will see the changes rendered instantly in the preview above. Once you have your desired result, click Save:
Your Snip will update instantly and the updated result will be copied to your clipboard!
Deleting a Snip
You can delete an individual Snip from that Snip’s result page:
You can delete all of your Snips from your Snip List page:
When you click the Delete all Snips button, you will be asked to confirm that you want to delete all of your Snips (since this is an irreversible action). Click the Delete All Snips button to confirm, or the Cancel button to cancel deletion.
Changing your settings
To access the app Settings, click on the Settings wheel at the top right corner of the app.
Go to Settings > General to customize:
- all keyboard shortcuts
- if you want Snip to start at Log in
- notifications
- app window behavior
Go to Settings > Formatting to customize:
- which format rows display in your app
- your desired math mode LaTeX delimiters
- whether or not to include extra spaces in your LaTeX
Quitting Snip
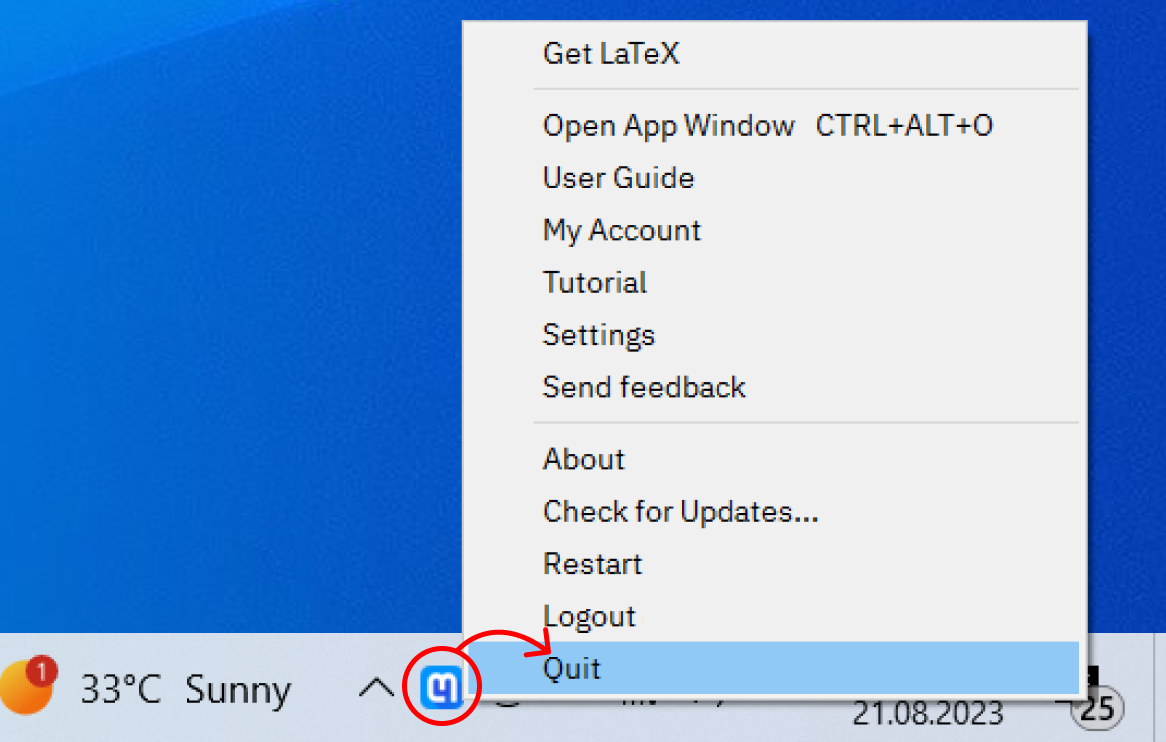
You can quit Snip at any time by right-clicking on the Mathpix icon in your system tray to open the menu and then choosing Quit.
Linux
The Linux app is distributed in form of AppImage and can be downloaded from Mathpix.com or via your terminal.
Please note that Snip is a system tray app. If you are running GNOME, which does not support the system tray, we recommend downloading this extension.
If you are running Wayland, for security reasons it will not allow you to use our app (the screen will turn black when you try to take a screenshot). In this case, we recommend switching desktop session to another one (Xorg, Kde, Xfce, LXDE) or using Mathpix Snip Web instead.
1. Getting Snip app and launching it
- Download the Linux AppImage
- Save AppImage file to the desired location
- Open “Files” app and navigate to the downloaded file
- Open its properties, switch to “Permissions” and allow executing file as program
- Launch the file
2. Getting Snip app and launching it from your Terminal (Advanced)
- Open your terminal. And execute the following
cd ~/Downloadswget https://download.mathpix.com/linux/Mathpix_Snipping_Tool-x86_64.v03.00.0152.AppImage -O Mathpix_Snipping_Tool.AppImagechmod 777 ./Mathpix_Snipping_Tool.AppImage./Mathpix_Snipping_Tool.AppImage
3. Updating app
App has its own update mechanism.
There is no need to redownload fresh version from site
There is no need to redownload fresh version from site